
Getting Rid of the Shrubs and Selling the Pergola
One of the things we realized we did not like was the bundle of shrubs right in the middle of the backyard. It was placed such that you couldn’t see the gazebo at the back of the house when you were standing by the house and if you were sitting in the gazebo, you couldn’t really see the rest of the yard. It was also a pain to prune because the branches actually grew quite fast and I couldn’t reach most of the tops and middle parts.

Removing them was quite an ordeal. I first cut back the branches as far as regular garden shears would allow. Kyler then took his circular saw and cut the larger branches, leaving just the roots and stumps. He then had to dig down quite far to dislodge the roots and some of them were quite massive.

We also didn’t care for the metal pergola near the house. To be clear, I am not sure this is what is called a pergola, but it had no roof so I’m calling it a pergola. We already had a nice gazebo at the back, with a roof, and had no need for another one that was right in the middle of the yard. So I put it on Kijiji and sold it to a really nice guy who didn’t mind helping us dismantle it in the rain at 7:00 in the evening.

Dismantling the Deck
Next was dismantling the existing deck structure. When we first moved in, we loved the idea of having a deck that basically took up most of the backyard. But it never felt as sturdy as it should have been and the paint was peeling in many places. And I realized I missed walking around in grass, in my bare feet. The whole deck system became less attractive of an idea after all…


And as it turns out, as spring rolled around, I started noticing a few pretty giant black ants randomly roaming around the house and figured out that they are likely carpenter ants, which spells out a nightmare if they take a liking to your house. I spent many an hour trying to lure them with bait traps and following them around the house, hoping they would lead me to their nest to no avail. They just wandered around aimlessly. So we made an educated guess as to where they were coming from and decided that was the last straw. The deck had to go.
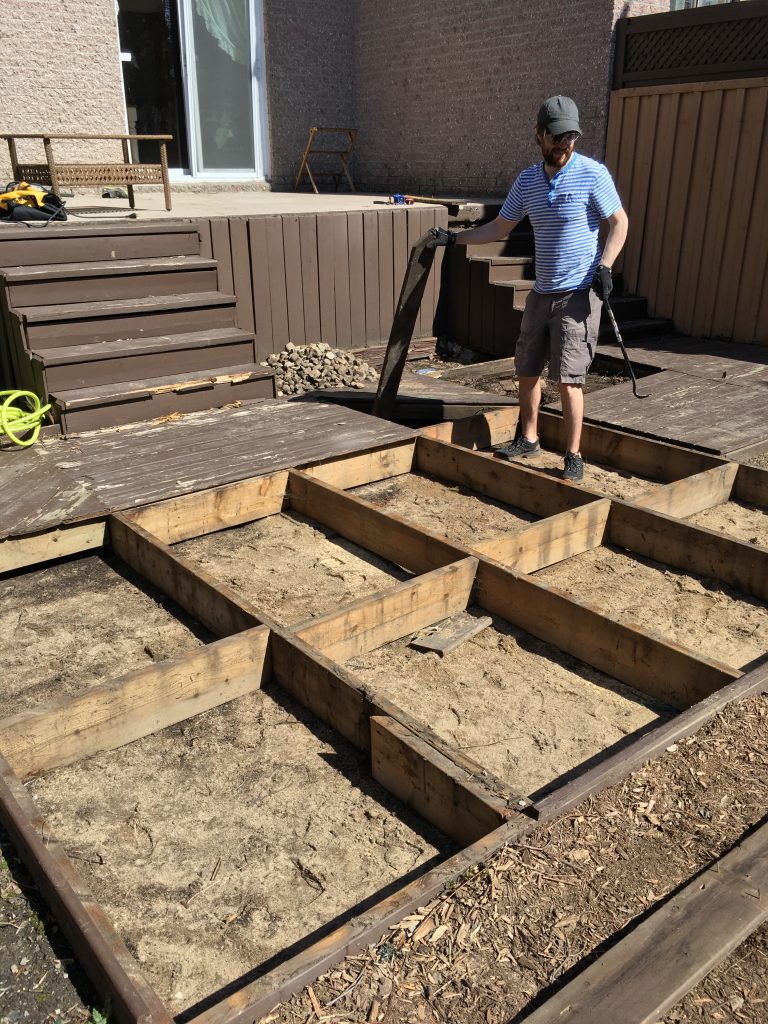

The dismantling of the deck was probably the most intense of all the steps to this process. Kyler dislodged them with a crow bar and I hammered down the nails (too lazy to pull them all out!) and stacked all the pieces by the gate. We then rented a Uhaul cargo van and did four trips to the eco centre to dump all the wood. As we were taking it apart, we noticed whole planks that were hollow and some pieces that were so soggy and starting to rot that there were mushrooms and weeds growing out of the wood. Yikes!


As you can see, we discovered all sorts of construction waste that was basically just dumped under the raised part of our deck. That was super fun to remove. Since getting rid of the deck, the number of ants in the house has drastically reduced, so that pretty much confirms what we were expecting. After doing a ton of research, the best I can figure it is, the nest doesn’t seem to be on our property and they were probably trying to set up a satellite nest in our deck. Since we’ve gotten rid of their hospitable potential home on our property, there’s not much else we can do besides keep them from coming into the house. In the future, we will replace our super old sliding door and back windows, which is how they’ve been able to make their way into our house, but one crazy expensive and time-consuming task at a time!
Clearing the Soil and Rebuilding the Stone Path

With the deck and bushes gone, it was time to deal with what was underneath them. There used to be a pool in the backyard and that portion of the yard was mostly just filled with sand (which we found a great use for later!) The rest of it had tons of rocks, roots, garbage and now broken pieces of deck everywhere, so I manually went through it all to pick out as much debris as I could, tilling, raking and redistributing the soil as I went to try and get the yard as level as possible. This is the giant pile of rocks and stones I was making as I picked them out of the ground.

At this point, we had been working for about five weeks and I was starting to get really frustrated. The process was so slow and the yard was a total mess! There were bags of branches and roots we still hadn’t gotten rid of from weeks ago. The impatience in me was taking over. It was hard to see the vision in my head of a beautiful backyard ever coming true. It also didn’t help that we had been getting way more rain than normal this spring and although our area thankfully experienced no flooding, it left the yard pretty damp and muddy for long periods and limited the time we could spend working on it.
But finally, the first piece of the puzzle fell into place when we took out the stones from one side of the yard and re-layed them down on the other side to create a path to the shed from the steps of the house. At last, I could see a glimmer of the new yard peeping through the chaos and it made me so happy and re-energized!


We used the sand from the pool pit to compact the soil and make it super smooth and level where we wanted to set the stones. After putting them down, we used some more sand to sort of set them so they couldn’t move. And the sogginess from the rain actually helped us with this task quite a bit. We just left the stones to sort of settle and sink into the dirt and sand, and they became firmly lodged in the ground on their own! After they settled, we added some decorative pea gravel between the stones to complete the setting process.

Enriching the Soil and Seeding the Lawn
Before we began this whole project, I tested the soil in the yard with one of these kits I found on Amazon. I was mostly concerned with the pH level and turns out, our yard was slightly alkaline. Once we worked the soil more, it became a bit clearer why. Our soil definitely seemed to be kind of clay-y.
Researching how to prepare soil for growing grass from seed resulted in many conflicting and confusing accounts of what is the “proper” way to do it. I mean, there are people who think it’s the dumbest thing you could do to try and grow it in the spring and fall is the only time you should make the attempt. Clearly, I have not listened to those people, but then it’s not exactly easy to know what information you should follow, especially since neither Kyler nor I have ever done anything like this before.
In the end, we decided to buy a bunch of bags of turf soil, especially enriched to make grass grow, regular black earth to sort of increase the density and overall volume of new soil and peat moss, to help make the ground more acidic and help with drainage.

We put down the black earth first, then the turf soil. And finally, the moment all of this work has been building up to. Planting the grass seeds! We bought a mixture of Kentucky bluegrass, perennial ryegrass, annual ryegrass and red fescue, and spread it as evenly as possible. Then we added some peat moss on top and raked it gently.
Watering and Waiting
The most important thing after seeding was making sure the soil stayed moist. I ended up watering it around three or four times a day because, just in time for us to seed, it became quite sunny and we even had a couple of days in the high 20s with humidity making it feel like the low 30s. I was pretty scared the seeds would dry out and die during this time and watered almost every hour from 9:00 to 6:00. Then, around day five, we noticed some tiny blades had sprouted up.


Like nearly every DIY house project on this blog, I totally underestimated how much work it would be and how long it would take. This whole process took about a month and a half, working pretty much every weekend and on and off during the week. I have so much respect for people who do this for a living. Manual labour is so difficult. I mean it doesn’t help that I found it hard to even lift the shovel cause it was so heavy and I’m a weakling, haha. But we got a baby shovel for me to use and turns out, having the right equipment makes a whole lot of jobs a whole lot easier. Who knew?

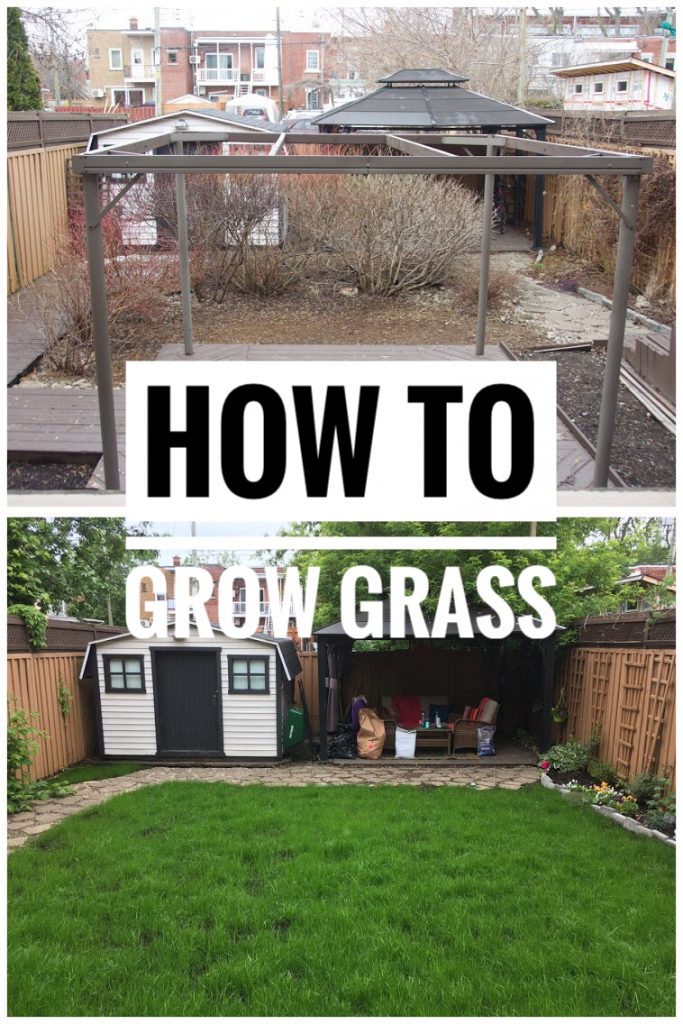
The results are a bit patchy but it’s nothing a little reseeding can’t fix. Watching the grass come in was so satisfying. It’s turned out even more beautiful than I could have imagined! And since I’ve decked out the gazebo and we’ve been able to open up the yard and bring some more life to it, I’ve been wanting to hang out in the backyard so much more than last summer, which is basically the point of having a backyard, right? And completing this intense and total backyard transformation, just the two of us, makes me appreciate and love it even more!
So what do you think about our backyard remodel? Let me know in the comments!
xoxo